OBS Studio: Automatic luminance filter
1. Usage
A common OBS: Studio setup is screenshare your screen, video game, or some video, while also having your webcam visible in the corner. Maybe you’re streaming a video game online or presenting your work to some coworkers.
If the content you’re streaming includes lengthy periods where the screen is particularly dark (a horror game, for example), your webcam feed is going to seem awkwardly bright by comparison. Even more awkward when the screen changes brightness frequently.
This article shows a method to automatically match the brightness/luminance of your webcam stream (or any visual “source”) to match the average brightness of another visual source.
The video below shows an example of this custom filter in action. It’s a recording of a OBS scene with two sources: a photo of a person (representing a hypothetical webcam stream) and a short video which simply fades between pure white to pure black.
This video also demonstrates some of the configurable features of this filter:
- The webcam has a minimum brightness. It’s still visible even when the video in the background is completely black.
- The webcam returns to full brightness well before the background video is purely white.
2. Requirements
OBS doesn’t support this kind of functionality out-of-the-box, so we’ll need the obs-shaderfilter OBS plugin to get it done.
The obs-shaderfilter plugin for OBS Studio is intended to allow users to apply their own shaders to OBS sources.
This plugin is available in nixpkgs, so in NixOS you can enable this plugin with a small module:
{
  outputs = { nixpkgs, ... }: {
    nixosConfigurations.${hostname} = nixpkgs.lib.nixosSystem {
      modules = [
        ({ pkgs, ... }: {
          programs.obs-studio = {
            enable = true;
            plugins = with pkgs.obs-studio-plugins; [ obs-shaderfilter ];
          };
        })
      ]
    }
  }
}
3. The shader program
uniform texture2d luminance_source;
uniform float min_brightness<
    string label = "Brightness in dark scenes";
    string widget_type = "slider";
    float minimum = 0.0; float maximum = 1.0; float step = 0.01;
> = 0.35;
uniform float max_brightness<
    string label = "Brightness in bright scenes";
    string widget_type = "slider";
    float minimum = 0.0; float maximum = 1.0; float step = 0.01;
> = 1.0;
uniform float sensitivity<
uniform float sensitivity<
    string label = "Sensitivity";
    string widget_type = "slider";
    float minimum = 0.5; float maximum = 5.0; float step = 0.1;
> = 2.0;

float4 mainImage(VertData v_in) : TARGET
{
    float4 c = image.Sample(textureSampler, v_in.uv);

    float lum = 0.0;
    for (int y = 0; y < 8; y++) {
        for (int x = 0; x < 8; x++) {
            float2 uv = (float2(x, y) + 0.5) / 8.0;
            lum += dot(luminance_source.Sample(textureSampler, uv).rgb,
                       float3(0.2126, 0.7152, 0.0722));
        }
    }
    lum /= 64.0;

    float k = lerp(min_brightness, max_brightness, saturate(lum * sensitivity));
    return float4(c.rgb * k, c.a);
}
This shader program has a simple algorithm. It samples the average luminance at 64 points across the image, multiplies that by the chosen “sensitivity” factor, interpolates that result between the chosen min and max brightness, and adjusts the target pixel as calculated.
64 samples may seem small (a 1080p image has over 2 million pixels), but because shaders cannot share state, this calculation needs to be performed for each pixel in the webcam image, so it needs to be fast. Additionally, the samples are evenly distributed across the image, so 64 samples will produce an accurate result in all but the most unusual cases.
4. Adding the filter
To make this work, we need a scene with two visual sources:
- the reference
- An visual source that will be constantly sampled, to measure its average luminance.
- the target
- A visual source that will have its luminance automatically adjusted to match the average luminance of the source.
To add the filter:
- In OBS’s Sources list, right click on the target source, and select Filters from the context menu.
- Click the ➕ icon under Effect Filters and select User-defined shader. If that option is missing, then the obs-shaderfilter probably hasn’t been installed correctly.
- Click on the newly added filter to edit its settings.
4.1. Filter settings
- Ignore all the “extra pixels” options.
- Load the shader text, by either copy/pasting it into the text box, or saving it to your harddrive and selecting the Loader shader text from file checkbox.
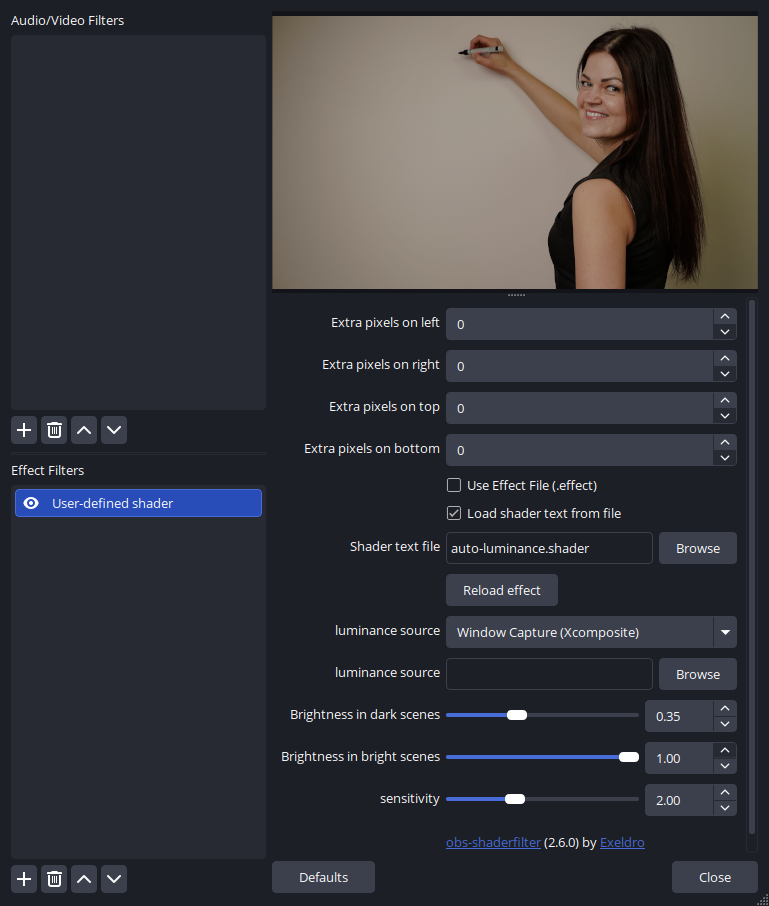
Once the shader is loaded, more options should appear:
- luminance source
- Select your reference source here from the dropdown selector. obs-shaderfilter gives an option to use an image file as your source, but that’s probably useless.
- Brightness in dark scenes
- This let’s you set a floor on how bright you want your target source to be. ie: its brightness when the reference source is completely black.
- Brightness in bright scenes
- This let’s you set a ceiling on how bright you want your target source to be. ie: its brightness when the reference source is completely white.
- Sensitivity
- How much an increase in brightness in the reference source affects the brightness of the target source. Higher numbers mean that the target will get brighter faster. Here are some example values:
| sensitivity | full brightness when reference’s luminance is ≥ |
|---|---|
| 1.0 | 100% (all 64 samples are pure white) |
| 2.0 | 50% |
| 4.0 | 25% |
5. All done
At this point, the filter should be working as intended. You can start dragging the sliders around to fine-tune the filter for your particular use-case. OBS will update your scene as you drag the sliders, so you can see how they affect your source in real-time.